Saturday, October 24, 2015

Creating A Blog Using Blogger


Step 1: Signing Up for Blogger

1. Go to www.blogger.com
2. Enter your Google Email and password into the Sign In box on the right side of the screen.
3. Click Sign In

Friday, October 23, 2015

Review: Asus Zenfone 2


Asus Zenfone 2

When it comes to smartphones, what drives your choices? If looks and materials are important to you, the bulky, plastic-shielded Asus Zenfone 2 won’t make your shortlist. But if all the stuff under the hood counts for more points, then the gigantic, hulking shape of the device won’t matter to you as much.
The massive Android phablet takes the “computer in your pocket” trope quite seriously. It’s an impressive multitasking machine that’s adept at video, web surfing, and running all manner of apps, though it suffers just a bit of a lag with some heavier games. It comes with a choice of two different high-end Intel Atom processors, both quad-core, both 64-bit. One version (costing $199) features a 1.8 GHz CPU with 2GB of RAM, and 16GB of memory. The faster phone (costing $299) has a 2.3 GHz processor with 4GB of RAM, and includes 64GB of internal storage. It’s the first Android phone to feature that much memory, the same as the Lumia 640 XL.

The Zenfone 2 does indeed come with top-shelf specs, and it’s a shame they’re packed in such an unattractive plastic body. To call it alarmingly huge is an understatement. The heavy, thick monolite shell expands rapidly from 3.9 millimeters at the edges to almost 11 millimeters at the center. All that interior volume in necessary to house the gigantic, integrated 3,000mAh battery, which is big enough to assure the phone lasts at least a full day, and often a couple of days, between charges. Switch on the phone’s “Ultra-saving Mode” and you can extend your battery life to three days. Impressive.
The power button sits at the top of the device, and the volume buttons can be found on the rear—just beneath the camera, à la LG. Removing (yep) the plastic cover grants access to a microSD slot that accepts cards up to 64GB, as well as two microSIM slots. One microSIM slot works with up to 150Mbps 4G data, while the other is limited to 2G. The compatibility of both slots extends only to GSM Networks, meaning you can use the Zenfone 2 with AT&T and T-Mobile, but not with Verizon, Sprint, or US Cellular.
Give It a Shot
Other than the differing chipsets inside, the two models of Zenfone share very much the same hardware. Both showcase a 5.5-inch HD IPS display made of Gorilla Glass 3 with a remarkable pixel density of 403ppi. The main camera has a 13-megapixel sensor with dual-LED flash light, a bright f/2.0 aperture, HDR, and Manual and Low Light modes. In optimal shooting conditions, it quickly takes usable images with good details. Some levels of noise creep into the more dimly-lit areas of the photos, but you can prevent those by tweaking the settings in the camera’s manual settings, which abound. There’s also a “Super Resolution Mode” that stitches together four different shots to make a single, 52-megapixel image. Neat, but it fails in achieving a visible improvement in the overall quality of the image.


asus-2-inline
When the sun goes down, the camera’s Low Light mode increases sensitivity by 400 percent to create incredibly bright night shots. I was able to get shots of scenes where a normal camera couldn’t detect anything in the dark. Resolution in this mode is limited to 3 megapixels, and some areas can be blurred, but still: objects you couldn’t see actually become visible. The front camera does a neat trick: it can capture up to 140 degrees of your surroundings by combining seven different shots. This feature is appropriately named the “Selfie Panorama.” Though I felt no need for this kind of feature, I must admit selfies can make much more sense with a lot of surroundings in the background. Point taken.
There are countless other camera features—so many, in fact, that I found myself just using the same two or three options all the time. Making the abundance of camera tricks seem even more like overkill is the fact that, overall, the camera doesn’t outperform the best ones out there, such as the iPhone’s top-shelf shooter. If you’re looking for a good “camera phone,” one that you can carry in place of a dedicated compact camera, there are better options.
The Skin I’m In
Asus has chosen to graft the company’s own ZenUI skin atop Android Lollipop. The heavy customization in ZenUI won’t appeal to Android purists, but it comes with some interesting features. Parents will like the ability to activate user profiles for guests and kids that can hide certain apps (and eventually notifications) and also to shut down access after a predefined period. I really liked the custom gestures. The ones I most appreciated were the convenient tricks that reminded me of the OnePlus One.The “Motion Gesture” lets you take screenshots simply by shaking the phone twice. “Touch Gesture” activates specific apps from standby with a quick swipe: draw an S to launch the messaging app, C to open the camera, W if you want to open the browser, V for the phone, E for email, and Z for ASUS Boost—that last one kills everything running in the background, clearing up large chunks of RAM in seconds. A double tap on the screen wakes up or suspends the phone instantly—nice, since it eliminates the need to stretch your finger all the way up to that un-handy power button. And much like we’ve seen on other big phones, double-tapping the home key engages a one-handed mode that shrinks the screen down to a smaller size. You can manually adjust the size of the smaller screen, going down to 3.5-inches.
Swiping up from the bottom of the display brings up a control panel. It’s here the Zenfone 2 offers some deep levels of personalization, with a mixture of fonts, wallpapers, icons, themes, and scroll effects. Altogether, there are hundreds of possible combinations that determine how your phone’s UI looks. You can even adjust color temperature, vividness and saturation of the display.


ui-cover-inline
Sadly, the phone comes with an egregious number of redundant apps pre-installed. Minutes after I set up my Zenfone 2, I deleted Jawbone’s UP app, Zinio, ZenCircle, and Omlet Chat. The factory-installed apps for the calendar, web browser, messaging, and music can’t be uninstalled. If you prefer to use Google’s superior apps, they will live side-by-side with Asus’s detritus. There’s even a “What’s Next” feature—a seeming rip-off of Google Now that gives you advance alerts based on your calendar.
Which Way to Zen?
The Asus Zenfone 2 is not a smartphone you fall in love with at first sight. And yet, it’s one of the best midrange phones around, with remarkable battery life, a great screen, and powerful processors that can do anything you’d ask of your mobile. Between the two versions, I’d recommend the cheaper one—the low cost and huge battery easily make it one of the most interesting devices in the under-$200 price range.
If you’re willing to spend $300 on a phone and you crave the outsider chic that the funky Asus hardware offers, there are better options than the spec’d up, more expensive Zenfone 2 model. Consider instead the OnePlus, the Alcatel Idol 3 or the Sony M4 Aqua

Monday, September 28, 2015

Build Cheap Home Server


How many gigabytes of movies, music, and photos do you have on your local hard disks, external drives, and random USB keys? We're willing to bet a lot. We'd also wager that the vast majority of this media never gets accessed--what a waste. Worse yet, all your accumulated data is just one inevitable disk failure away from being lost forever. It's time to give your media a safer and smarter home in the form of a Home Server. We'll show you how to build an inexpensive but powerful server to back up, share, and stream your files.

Read on to learn how we decided between Intel and AMD builds (spoiler: we built both), how to set up Windows Home Server, and what third-party programs to add to leverage the power of a dedicated server.

The Performance Test: AMD vs Intel

When we started building our home server, we knew we wanted a price around $500, but we weren't sure what CPU architecture to use. Our budget limited us to around $100 for CPU, which meant we could choose between a dual-core Intel Core i3 530 ($115) or a quad-core AMD Athlon II X4 630 ($99). The problem? We wanted to be able to do light video transcoding and file container repackaging on the server. Our previous experience with lightweight, NAS-style Windows Home Server machines made us skeptical that dual-core machines would have the CPU juice needed to handle any transcodes, much less transcoding HD resolution source material. 
Kill A Watt meter
 

Windows File Transfer Test

Using Windows default file browser to transfer our test files, we saw a fairly clear performance victory from the AMD machine in every test other than the large file download. No matter what we did, the AMD system just choked on the 4GB file, it took almost 30 seconds longer to download the file from the AMD server than it did from the Intel one. The Athlon-equipped server handled the smaller files better than the Intel server, turning in the only single-digit transfer time we saw. 
 

Windows File SharingAthlon II X4 630Core i3 530
 Large File Download (sec) 76.7 48.2
 Large File Upload (sec) 49.1 54.2
 Small Files Download (sec) 8.7 16.8
 Small Files Upload (sec) 41.5 41.8
 

FTP Test

Our FTP test showed different results. The AMD machine took two tests, the Intel machine took two tests. While most of the scores were close, the small files upload was dominated by the Intel machine. We're not sure why the discrepancy, but as with the Windows file transfer test, it's not a big enough problem to knock either machine.
 

FTP File TransferAthlon II X4 630Core i3 530
 Large File Download (sec) 51.7 50.9
 Large File Upload (sec) 51 53.12
 Small Files Download (sec) 14.2 16.6
 Small Files Upload (sec) 81.2361.82

Power

Power turned out to be the big differentiating factor on our Home Servers. While the dual-core Intel machine drew a meager 49W at idle and 70W under load, the quad-core Athlon was a juice guzzler in comparison--pulling 71W at idle and 90W under load. While it's true that it's a little unfair to compare power use between a dual-core and quad core, the performance (in video transcoding and network transfers) and price are close enough that we're comfortable making the comparison. And, the fact that the Intel machine was fast enough to do what we wanted while pulling less power was enough to make it the winner of our Windows Home Server test.
 

Power UsageAthlon II X4 630Core i3 530
 Idle (W)71 49
 Load (W) 9070
   

The Complete Parts List  


CategoryPartPrice*
CPU Intel Core i3-530 $115
Motherboard  Gigabyte GA-H55M-S2H $88
Case  Cooler Master Elite 310 ATX $40 
Primary Hard Drive Seagate Barracuda 1TB 7200rpm $84 
Operating System  Windows Home Server OEM $100 
Memory Crucial DDR3 4GB kit $112 
Power Supply  Antec 500W $50 
Additional Hard Drives (optional)  Western Digital Caviar Green 2TB$136 

TOTAL:  $725 ($580 w/ 1 drive)
*All prices are from Amazon, as of May 25. 

Setting Up Windows Home Server

Once you've build your server, it's time to get Windows Home Server installed. Without this OS, there's really nothing different between the server and any desktop PC. In fact, that's why you can easily repurpose an old desktop as a home server just by installing WHS. The install process is fairly straight forward, but we'll walk you through the important steps and offer some pro tips.


Install from a USB key

Depending on how you obtained Windows Home Server (either by buying an OEM DVD or downloading the trial version), your install process may differ a bit. For our purposes, we're using the downloaded trial ISO, which we've then mounted on a hard drive using Slysoft's freeware Virtual CloneDrive utility. The reason we've done this is because, well, our Home Server doesn't actually have a DVD-Rom drive! It doesn't need one, either, because we're going to install the OS using a USB key. The web ISO is also more up-to-date than currently shipping OEM DVDs, so you can avoid having to install as many OS updates.
 

this guide will show you how to do it in Windows Vista or 7. Once the thumbdrive is formaltted properly, just copy the entire contents of the Windows Home Server mounted DVD onto the key. The files take up 860MB, so if you're using a 1GB key, you'll have some extra storage space. We recommend searching for and downloading your motherboard and network drivers (make sure they're compatible with Windows Server 2003) and putting those files on the USB key so the OS install wizard can recognize your hardware. 

Configure your motherboard BIOS to boot from the USB key to start the WHS installation process. The install wizard will ask for you to input some basic preferences, such as the server name and a strong administrator password. It'll also show you what hard drives it's detected in your machine, so make sure both drives are present. When prompted to choose a primary drive for the OS, select your fastest hard drive. In our case, that's the Seagate 1TB drive. WHS will format all installed drives and configure them with its unique filestructure. When setup is finished, the server will restart and be ready for use. The OS will resemble the Windows you're familiar with, complete with the Desktop and Start Menu. Head into the Control Panel and finish installing any missing drivers to get the server network-capable.
 

Add and manage clients


servername:55000", with servername being the name you gave to the server during the OS install. This takes you to a server's Connector setup page, where you can download the Connector software. Run the executable, and the Connector will automatically search for your server and pair them. You'll need to type in the server's administrator password, as well as set when to allow backups to occur. 

Download and install the Connector software on every machine you want your WHS to back up (up to 10). When installed properly, the Connector should appear in your Windows system tray. This is where you'll be manually start backups, access network shares, and load the Windows Home Server Console to manage backups, add users, monitor storage, change server settings, and install Add-ins.
 

Set Up Remote Access


guides at Port Forward. You will also need to set a static local IP address for your WHS. Every computer on your local network is assigned a local address, though the assignments may change depending on which systems are connected. You need to ensure that the server is always given the same address. This guide shows you how to do that.

Once WHS verifies that your Server can be accessed from the web, you can set up a homeserver.com subdomain. Click the Configure button under Domain Name and run through the setup wizard. WHS will require that you have a Windows Live account to use this feature--this is the same as your Xbox Live login. Once you approve Microsoft's terms and conditions, you can choose any homeserver.com subdomain that is still available. If everything is done right, you'll be able to access your server's files using this address. 
 

Backing up a Mac


our guide to setting up Mac Time Machine backups on WHS here
  

Additional software and services

Windows Home Server supports Add-Ins, which are third-party extensions that enhance the functionality of the server from within the console software. We list our six favorites here. But while Add-Ins are useful for maintenance and administrative tasks, power users will want to install additional server software to make the most out of the machine's multi-core processor and generous stock of memory. Since WHS can run Windows software, this is a breeze. The only thing you should keep in mind is that these programs should be installed as Windows Services, so they automatically load up without any user logging onto the machine. To install these programs, you'll need to move the files over using network shares and log into your Server using Windows' Remote Desktop utility.

PS3 Media Server 


our guide to properly setting that up here.
 

Air Video

Getting video to a networked game console is one thing, but streaming wirelessly to an iPhone or iPad requires another server service. Fortunately, there's an app for that. Air Video ($3) is an iPhone and iPad app that can play video streamed to it from a desktop or server software counterpart. Getting Air Video running on WHS requires configuring it as a service, and we show you how here.
FileZilla FTP Server 
Even though you can use Remote Desktop or Remote Access to log into your Windows Home Server to transfer files, using an FTP server is far more efficient and versatile. Using FTP, you get built-in error checking for file transfers, queue transfers, and create user accounts to share with your friends and associates. WHS's unique filesystem makes setting up an FTP server more than just downloading and running an executable, so we'll show you what you need to do to get a FTP server running on your Windows Home Server.

Microsoft SyncToy


And that's it! In a Home Server, your data and media files are more secure, versatile, and accessible. With disk storage prices at all time lows (2TB for approaching $100!), you'd be foolish not to run a server, if only for backup. And if you're already running a server at home, share your experiences in the comments below!

Monday, September 7, 2015

SEJARAH SINGKAT TENTANG JARINGAN & TOPOLOGI


Sejarah Singkat Tentang Jaringan


Pada tahun 1940-an di Amerika ada sebuah penelitian yang ingin memanfaatkan sebuh perangkat komputer secara bersamaan. Pada tahun 1950-an ketika jenis komputer membesar sampai tercipta super komputer, karena mahalnya harga perangkat komputer maka ada tuntutan sebuah komputer mesti melayani beberapa terminal. Dari sini maka mulcul konsep distribusi proses berdasarkan waktu yang dikenal dengan nama Time Sharing System (TSS), bentuk pertama kali jaringan komputer diaplikasikan. Pada system TSS beberapa terminal terhubung secara seri kesebuah host komputer.
Selanjutnya konsep ini berkembang menjadi proses distribusi (Distributed Processing). Dalam proses ini beberapa host komputer mengerjakan pekerjaan besar secara paralel untuk melayani beberapa terminal yang tersambung secara seri disetiap host komputer.
Selanjutnya ketika harga-harga komputer kecil mulai menurun dan konsep proses distribusi sudah matang, maka penggunaan komputer dan jaringannya mulai beragam, dari mulai menangani proses bersama maupun komunikasi antar komputer(Peer to Peer System) saja tanpa melalui komputer pusat. Untuk itu mulailah berkembang teknologi jaringan lokal yang dikenal dengan Local Area Network (LAN). Demikian pula ketika internet mulai diperkenalkan, maka sebagian besar LAN yang berdiri sendiri mulai berhubungan dan terbentuklah jaringan raksasa ditingkat dunia yang disebut dengan Wide Area Network (WAN).

Topology Jaringan
1. Topologi Ring
Pada topologi ring setiap komputer di hubungkan dengan komputer lain dan seterusnya sampai kembali lagi ke komputer pertama, dan membentuk lingkaran sehingga disebut ring, topologi ini berkomunikasi menggunakan data token untuk mengontrol hak akses komputer untuk menerima data, misalnya komputer 1 akan mengirim file ke komputer 4, maka data akan melewati komputer 2 dan 3 sampai di terima oleh komputer 4, jadi sebuah komputer akan melanjutkan pengiriman data jika yang dituju bukan IP Address dia.

•Kelebihan dari topologi jaringan komputer ring adalah pada kemudahan dalam proses pemasangan dan instalasi, penggunaan jumlah kabel lan yang sedikit sehingga akan menghemat biaya.
•Kekurangan paling fatal dari topologi ini adalah, jika salah satu komputer ataupun kabel nya bermasalah, maka pengiriman data akan terganggu bahkan error.

2. Topologi Bus
Topologi jaringan komputer bus tersusun rapi seperti antrian dan  menggunakan cuma satu kabel coaxial dan setiap komputer terhubung ke kabel menggunakan konektor BNC, dan kedua ujung dari kabel coaxial harus diakhiri oleh terminator.

*Kelebihan dari bus hampir sama dengan ring, yaitu kabel yang digunakan tidak banyak dan menghemat biaya pemasangan.
*Kekurangan topologi bus adalah jika terjadi gangguan atau masalah pada satu komputer bisa menggangu jaringan di komputer lain, dan untuk topologi ini sangat sulit mendeteksi gangguan, sering terjadinya antrian data, dan jika jaraknya terlalu jauh harus menggunakan repeater.

3. Topologi Star
Topologi ini membentuk seperti bintang karena semua komputer di hubungkan ke sebuah hub atau switch dengan kabel UTP, sehingga hub/switch lah pusat dari jaringan dan bertugas untuk mengontrol lalu lintas data, jadi jika komputer 1 ingin mengirim data ke komputer 4, data akan dikirim ke switch dan langsung di kirimkan ke komputer tujuan tanpa melewati komputer lain. Topologi jaringan komputer inilah yang paling banyak digunakan sekarang karena kelebihannya lebih banyak.

*Kelebihan topologi ini adalah sangat mudah mendeteksi komputer mana yang mengalami gangguan, mudah untuk melakukan penambahan atau pengurangan komputer tanpa mengganggu yang lain, serta tingkat keamanan sebuah data lebih tinggi, .
*Kekurangannya topologi jaringan komputer ini adalah, memerlukan biaya yang tinggi untuk pemasangan, karena membutuhkan kabel yang banyak serta switch/hub, dan kestabilan jaringan sangat tergantung pada terminal pusat, sehingga jika switch/hub mengalami gangguan, maka seluruh jaringan akan terganggu.

4. Topologi Mesh
Pada topologi ini setiap komputer akan terhubung dengan komputer lain dalam jaringannya menggunakan kabel tunggal, jadi proses pengiriman data akan langsung mencapai komputer tujuan tanpa melalui komputer lain ataupun switch atau hub.

*Kelebihanya adalah proses pengiriman lebih cepat dan tanpa melalui komputer lain, jika salah satu komputer mengalami kerusakan tidak akan menggangu komputer lain.
*Kekurangan dari topologi ini sudah jelas, akan memakan sangat banyak biaya karena membutuhkan jumlah kabel yang sangat banyak dan setiap komputer harus memiliki Port I/O yang banyak juga, selain itu proses instalasi sangat rumit.
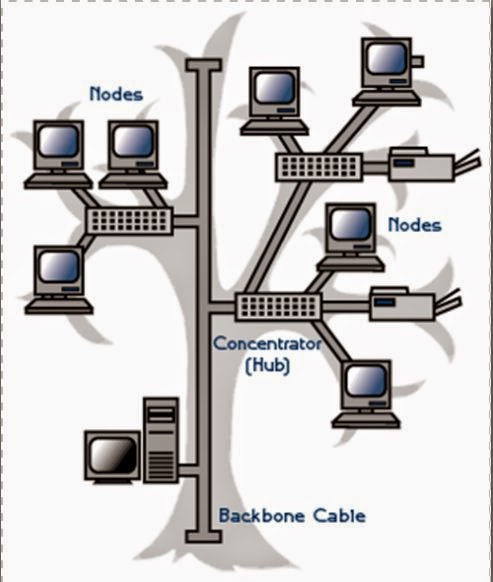
5. Topologi Tree
Topologi jaringan komputer Tree merupakan gabungan dari beberapa topologi star yang dihubungan dengan topologi bus, jadi setiap topologi star akan terhubung ke topologi star lainnya menggunakan topologi bus, biasanya dalam topologi ini terdapat beberapa tingkatan jaringan, dan jaringan yang berada pada tingkat yang lebih tinggi dapat mengontrol jaringan yang berada pada tingkat yang lebih rendah.

Kelebihan topologi tree adalah mudah menemukan suatu kesalahan dan juga mudah melakukan perubahan jaringan jika diperlukan.
Kekurangan nya yaitu menggunakan banyak kabel, sering terjadi tabrakan dan lambat, jika terjadi kesalahan pada jaringan tingkat tinggi, maka jaringan tingkat rendah akan terganggu juga.

Monday, August 31, 2015

ANTI COPY PASTE IN YOUR BLOG


here how to install

1.  Login in Blogger.com
2.  And Click Menu "Template" and choose "Edit HTML"

QUICK TUTORIAL TO INSTALL A GRAPHIC CARD IN PC


  * This is Gigabyte GTX 650ti Graphic Card


HOW TO INSTALL AMD PROCESSOR


AMD’s chips have both a different kind of socket and a different method of mounting heatsinks compared to Intel’s system.
Looking at a fresh socket FM2+ motherboard, you’ll see that there are no metal pins on AMD’s socket. Rather, the pins that connect the CPU to the motherboard are on the underside of the CPU with AMD’s chips.

HOW TO INSTALL INTEL PROCESSOR


Start with your motherboard outside of your PC’s case, on a flat surface. Release the small metal lever holding the CPU retention bracket to Intel’s LGA socket in the motherboard.

THE DEFINITION OF CELLPHONE (MOBILE PHONES)


Cellular telephone, sometimes called mobile telephone, is a type of short-wave analog or digital telecommunication in which a subscriber has a wireless connection from a mobile phone to a relatively nearby transmitter. The transmitter's span of coverage is called a cell. As the cellular telephone user moves

Sunday, August 30, 2015

QUICK TUTORIAL TO CREATED A BOOTABLE LINUX MINT USB DRIVE ON WINDOWS

 
1.  Download Linux Mint
The current version of Linux Mint is version 17. 
To get Linux Mint 17 visit http://www.linuxmint.com/download.php.
There are a number of download options available and the one you choose to download will be based on the specifications of your host machine.

If you have a new and modern computer then click on the link for Cinnamon. If you have a 64-bit computer click on the 64-bit link otherwise click the 32-bit link. If after following this guide you decide that Cinnamon isn't your thing then try again but go for the KDE version.

If you have an older computer then click on the link for MATE. Again if you have a 64-bit computer click on the 64-bit link otherwise click the 32-bit link. If after following this guide you decide that MATE isn't your thing then try out the XFCE version.

Ignore the links with no codecs and the OEM versions.

When you get to the download page click on the link of the server that is closest to you.

The download of the Linux Mint ISO should start and depending on your speed can take some time. 

2. Create a bootable USB drive

Insert a blank USB drive into your computer.


To create a bootable USB drive the tool that I advocate using is the Universal USB Installer from www.pendrivelinux.com.
Follow the above link for pendrive Linux and scroll half way down the page until you see the "Download UUI" link. Click on the download link and wait for the program to download.

When the download has completed double click on the executable.


When the license agreement screen appears read it and then click "I Agree" if you accept the license.

Creating the drive is fairly straight forward.

The first thing to do is choose your distribution of choice, in this case Linux Mint, from the dropdown list.

Click on the "Browse" button. Find the downloaded Linux Mint ISO.


Select your chosen USB drive letter and make sure that the "We will format" option is checked.

At this point you can create the USB drive so that it persists data. This makes it possible to install software when using the live Linux Mint version and it will still be available the next time you boot from the USB drive.

Click "Create" to continue.


A summary screen will tell you what is about to happen.

Basically your USB drive is about to be completely wiped and Linux Mint is about to be installed as a live image to it.

If you are happy to continue click "Yes".


You will now see a progress bar showing how far through the process the installer is and how long it is expected to last.


The last

Reboot your computer and Linux Mint should now boot from the live USB.

EASY WAY TO CREATED A BOOTABLE USB STICK ON UBUNTU

To create a USB stick from which you can install Ubuntu, you must first download Ubuntu. Then, follow these instructions:


  1. Insert a USB stick with at least 2GB of free space 
  2. Open the dash and search for Startup Disk Creator.
  3. Select the Startup Disk Creator to launch the app.
  4. Click 'Other' to choose the downloaded ISO file.
  5. Select the file and click 'Open'.
  6. Select the USB stick in the bottom box and click 'Make Startup Disk'.
  7. That’s it! When the process completes, you’ll be ready to restart your computer and begin installing Ubuntu.

EASY WAY TO MAKE BOOTABLE WINDOWS 7

The fastest way to install windows 7 is from a bootable usb drive. You can cut the install time down to around 15 minutes compared with 30-40 via DVD if you use a fast drive.
People still asking me to explain what is the best way to do this as many of the guides online are too complex, or require third party software which doesn’t always work as they supposed to.
With this BootableUSB guide all you need to ensure is that your motherboard supports USB booting, and this is a common feature now for most of the computers.
Today I am going to publish a step by step guide which works perfectly and doesn’t require any additional tools – I have been doing it for some time now to create bootable Windows install drives.
You need to get hold of a fast USB 2.0 flash drive. It doesn’t need to be 32GB or bigger,however, all you need is a 4GB unit. The faster it is, the better.

What you need:
– Windows 7 DVD install disc or ISO image
USB Drive (4GB+ and as fast as you can get)
– Running Windows Operating system
– Working set of hands and eyes
– A few minutes of your life

THE BENEFITS OF TECHNOLOGY IMPLEMENTATION IN EDUCATION

Basically, technology is created to ease humans’ work. Nowadays technology has become the primary needs of humans. Even technology has been used in all aspects of human life, such as in the fields of medicine, communications, military, transportation and education. From those various fields, the implementation of technology in education is still very limited.

DEFINITION OF INTERNET

Understanding the Internet? Internet itself is derived from the word - (interconnection networking), an entire global system of interconnected computer networks that use the standard Internet Protocol Suite ( TCP / IP )